Good afternoon, I hope your holiday season was filled with laughter, family and lots of fun. I had an amazing holiday season, from Thanksgiving through the New Year. Despite all of us having some sort of cold and some point during that entire span. I was able to visit my parents in the south for Thanksgiving, go on an amazing 7 night southern caribbean cruise with my husband and two oldest, spend the Christmas holiday with my husband’s parents and then New Years nursing some serious head colds! It has been fun, but it is time to get back to crafting!
Most of the U.S. crafters who are part of CHA (Craft & Hobby Association) are in California this week checking out all the new goodies manufacturers have come up with. It is funny, I remember watching Carol Duvall on HGTV back in the late 90’s and she would always do a feature on the annual CHA show. It has to be an amazing experience to go, with WAY too many people, but still, I think my introvert personally could handle a little over load to see all the wonderful new tools and supplies! Maybe some day.
 On to my project for this month (yup, I hope to do this at least monthly)! I have an added gift also for all you ScanNCut lovers! I would like to share with you, provided I can figure out how to add it to this blog (if not, post a comment and we can figure out how to get it to you – It will be uploaded into the files on the FB group ScanNCut Applelover53)! Let’s get started, it is a Valentine’s Card. And this blog will not go into the specifics on how I designed the card, I have learned all that I know from watching Ashley Morrison’s You Tube channel at Applelover53. She is definitely worth checking out if you are interested in learning all that your ScanNCut or ScanNCut2 can do. She has some wonderful tutorials on how to use the FREE canvas software that allows you to make any design you want or convert svg files into fcm files.
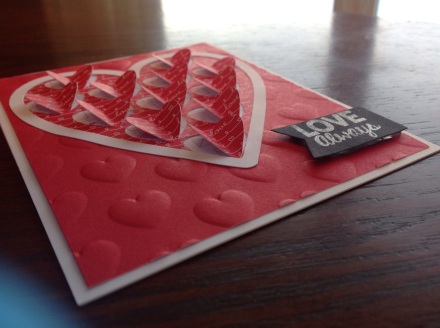
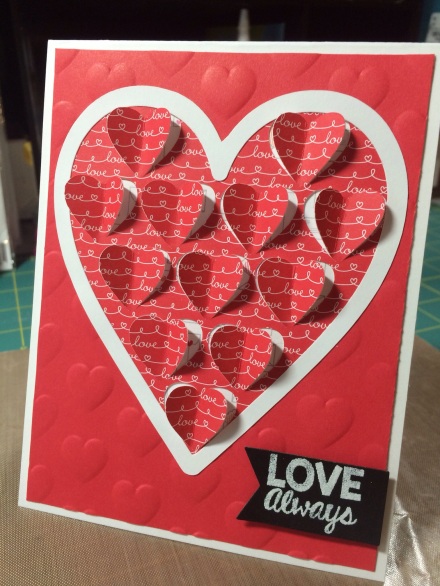 I started this project in Brothers Canvas software. I used basic shapes and just edited them a bit to create the desired effect. I started with a heart shape and filled the heart with a multiple of small hearts, which I deleted the cut lines in the centers to create to flapping hearts. I then used the big heart outline and created in inward offset and outward offset of the heart line to create a frame.
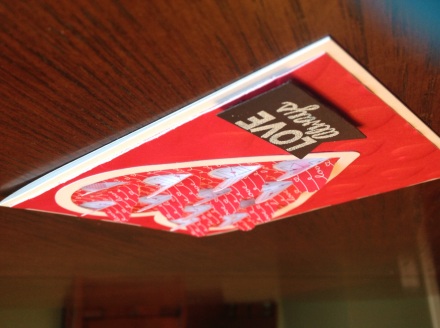 To create the card, you should just make two because the negative from one heart can be used for the background of the other, cut two of the hearts with the square (each in different pattern or plain papers) and cut two of the frames. Another piece of pattern paper was cut to be placed behind the heart with the flapping sides, so create visual interest. I used WeRMemory Keepers Next Level embossing folder on the background portion of card to create beautiful dimension (the negative area). Apply the background pattern paper to cover the hole created by the negative area and then the embossed paper to a standard base card top folding (I did cut down the background by 1/8 of an inch on each side to create a tiny border around the card) using ATG dry adhesive. The heart with flapping hearts were adhered using liquid glue after I used a gently pulled each flap towards each other. Apply glue sparingly so you don’t have it oozing out on the sided and be sure not to glue any flap areas down. For the heart frame, I ran the die cut through my Xyron stamp maker, this way I knew I would get good coverage. This took a bit of patience to place, I started at the base and worked my way up, the frame is tight, and I had to use a craft pick to lift up some of the heart flaps as I worked my way up and around the curve. The sentiment is from The Stamps Of Life December 2015 Card Kit Club and a banner die (also available from TSOL), which I heat embossed using white powder which I added some Elizabeth Crafts micro-fine glitter to. The sentiment was adhered with some KoolTaK clear dimensional tape.
 Finish off the card as you see fit with sentiments inside or leave blank to write what you wish. Thank you for reading. I do appreciate anyone willing to read my babble. I am a person that loves to create, engineer and work with numbers, not so much on the writing part.
If you enjoy what I created, but don’t feel you can create it, I do have a few for sale. I will have several Valentine’s Day cards available on my etsy shop in the next week (if they are not there already). So please check that out at BarbaraAnnCrafts (etsy.com/shop/barbaraanncrafts). Comments are ALWAYS welcomed and you can find me on instagram at BarbaraAnnCrafts.


